This is a step by step guide for people who are unfamiliar with how to add pages to this and other wiki sites.
First you need to know what you are going to call your page. If you are posting a character profile, it's a good idea to simply name the page after the character. For example, if you have a charachter called John Smith, then you should call your page 'John Smith'. But first you need to know how to make a new page in the first place.
Creating A Page[]

At the top of the home page you will see a button that says 'Contribute'. Click on this button to show a drop down menu with several options.

The third option in this new menu should be one that says 'Add Page'. This is the option you want to click.

Now you need to decide on a name for your page. For the purposes of this tutorial, I will be showing you how the profile of NPC character Marian Grey came to life.
You can either choose 'Standard Layout' or 'Blank Page' It doesn't matter either way.
Adding Text To Your Page[]
Text makes up the main body of any wiki page, and there are several different fonts and types of text you can have.

These are exmaples of the headers as they appear in the editing box. After the page is published, these headers will not only serve to break up your page and organise and manage the information to make things easier for the reader. They will also create a contents box at the top of the page, to make navigating the page easier, also.
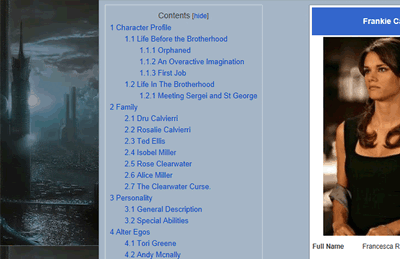
As we have yet to fill in any of Marian's information, here is the contents box of another character page, to show you how the contents box will look when finished.

As you can see the various bullet points of the contents have different numbers and are aligned within the box differently.
The points furthest to the left, with only one number by them (1. Character Profile, 2. Family, etc) are the texts written using Header 2.
The next points in, with two numbers (1.1 Life Before the Brotherhood, etc) , are written using Header 3, whilst the point aligned furthest to the right, with three numbers in front of them (1.1.1 Orphaned, etc), are written using Header 4.
Anything else that is written is written in 'normal text'. There are also variations of this, as shown below...
Normal Text
Bold Text
Italic Text
Underlined Text
Strikeout Text
Now you can add whatever text you want to your page and make it as informative and as detailed as you desire.
Adding Pictures To Your Page[]


If you want to add pictures to your page, you need to look first of all in the menu bar to the right of the page. You will see the first box on the list is called 'Photo'. This is the one you want to choose.


A box like this will come up. At the top, where it says 'Upload', there are two options. 'Browse' and 'Upload'. First of all, you need to have the picture that you want saved onto your computer somewhere. Then choose 'Browse'. This will bring up a box displaying all the images saved onto your computer and you can choose the specific image that you want. Once you have chosen it. choose 'Upload'.


If there is already an image on the wiki that you want to use instead, you can simply select it, like I am going to do with this picture of Marian that I uploaded a while back. Either way, it will still bring you to the same screen, shown below.


Now you are shown a screen like this, with a preview of the picture that has been chosen, a text box underneath and a small box on the right hand side of the page.
The text box beneath the picture is if you wish to add a caption so that when the picture is displayed on the page, a small description appears beneath.
In the box to the right, you have a slidebar. This changes the size of your picture, so have a fiddle around until you are happy with how big or small you want your picture to appear. Beneath this slide bar are the options for alignment. You can either have your picture to the left of the page, like this one, or to the right of the page.
Once you have chosen all your options and are happy, choose the option at the bottom of the page that says 'Add Photo'.


And voila!
Here are two pictures showing the left and right alignment options.
Adding The Profile Box To Your Page[]

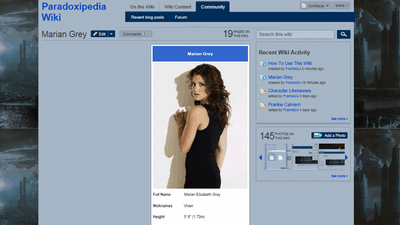
The profile box is the white box shown in the top right of each page, displaying basic information about the character including...
- Profile Picture
- Full Name
- Nicknames
- Height
- Race
- Unique scent
- Likes
- Dislikes
- Vehicles Owned
- Weapon of Choice
- Favourite Time Periods


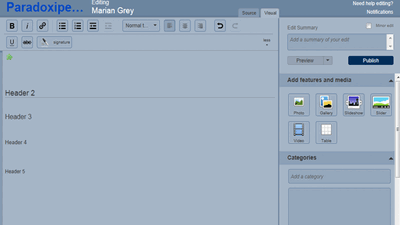
When you first create a page you'll be displayed with something like this. Whilst this is fine for adding pictures and text in general to the page, it's not going to help us add the info box like the one above.


To do that, we first need to change the page from 'Visual' to 'Source'. There are two tabs at the top right here where you can switch quickly and easily between both modes. Choose 'Source'.


Now the menu bar at the top has changed, but we don't need to worry about this too much, however.
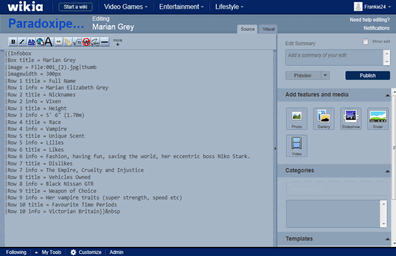
In the text area now, you need to type this (or copy it if you find it easier).
{{Infobox
|Box title =
|image =
|imagewidth =
|Row 1 title = Full Name
|Row 1 info =
|Row 2 title = Nicknames
|Row 2 info =
|Row 3 title = Height
|Row 3 info =
|Row 4 title = Race
|Row 4 info =
|Row 5 title = Unique Scent
|Row 5 info =
|Row 6 title = Likes
|Row 6 info =
|Row 7 title = Dislikes
|Row 7 info =
|Row 8 title = Vehicles Owned
|Row 8 info =
|Row 9 title = Weapon of Choice
|Row 9 info =
|Row 10 title = Favourite Time Periods
|Row 10 info = }}
Now you can start to fill in the blank spaces with your own information regarding your own character. As an example here is Marian's one filled in.
{{Infobox
|Box title = Marian Grey
|image =
|imagewidth =
|Row 1 title = Full Name
|Row 1 info = Marian Elizabeth Grey
|Row 2 title = Nicknames
|Row 2 info = Vixen
|Row 3 title = Height
|Row 3 info = 5' 6" (1.70m)
|Row 4 title = Race
|Row 4 info = Vampire
|Row 5 title = Unique Scent
|Row 5 info = Lilies
|Row 6 title = Likes
|Row 6 info = Fashion, having fun, saving the world, her eccentric boss Niko Stark.
|Row 7 title = Dislikes
|Row 7 info = The Empire, Cruelty and Injustice
|Row 8 title = Vehicles Owned
|Row 8 info = Black Nissan GTR
|Row 9 title = Weapon of Choice
|Row 9 info = Her vampire traits (super strength, speed etc)
|Row 10 title = Favourite Time Periods
|Row 10 info = Victorian Britain}}
The only part that has not been filled in is the image section. Adding a picture to this box is a little more complex than adding pictures to the main page, so I'll explain now how to do it.
Adding A Picture To Your Profile Box[]
First of all you need to refer back to step three about adding images to a page. Once you have chosen the picture you would like to use, add it to the page like all the other images you may (or may not) have already added.
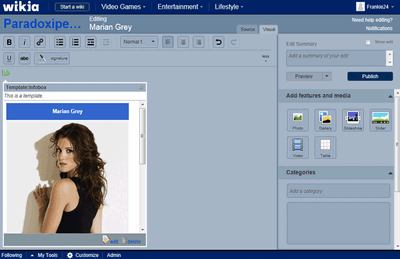
To make it easier to show you, I will be adding the picture to a blank page that only has our created text box on it, and nothing else.
So, after the picture has been added, your page will look like this.


Up in the top left corner you can see a small green puzzle piece. This is the information box that you have already created.
Now what you need to do is change the page back to 'Source' using the Source tab (Refer back to Step 4 if unsure.)

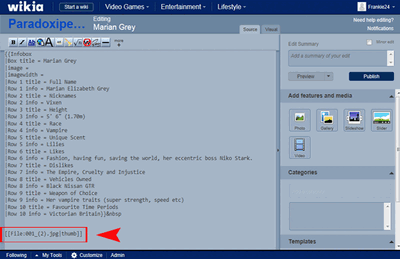
Now you will see the coding for your info box, along with the code for your image underneath. Simply copy and paste (or drag and drop) the image code from the bottom into the blank section of the info box code, where it says
|image =

Now your code should look something like this (I added in the picture size to the 'imagewidth' section underneath, as well. Anything between 250px and 300px should be fine.

When you switch back to 'Visual' using the tabs, your page should now look blank again with no picture, just the green puzzle piece in the top corner. Don't worry, this is what it's supposed to look like. Now, if you hover over the puzzle piece, you will see a preview of your information box, with the picture inside it. And that is your info box done. When you publish the page now, it will be displayed at the top right of the page for all to see when they view your page.
Publishing Your Page[]
And that's it, for this tutorial! Now all you need to do is add whatever content and pictures you desire to your page, and when you are happy with it, you can either choose the 'preview' button to see a preview of what your page will look like first, so that you can make any changes that may be necessary (to the layout, etc).
Or you can just go straight ahead and choose publish to make your page official.
So remember, have fun and if you need help, don't be afraid to ask!